- Utilizing database connection pooling services provided by the container, i.e. Tomcat uses Commons DBCP and Commons Pool as the implementation (tomcat-dbcp.jar).
- Externalizing database connection and make it independent from the web application itself.
- Sharing database connections across applications deployed in the container.
The following examples are tested in Tomcat 7 and MySQL Database 5.5.
1. Sample MySQL database
First, we need to create a sample database. Let’s execute the following MySQL script:
1
2
3
4
5
6
7
8
9
10
11
| create database usersdb;use usersdb;CREATE TABLE `users` ( `user_id` int(11) NOT NULL AUTO_INCREMENT, `username` varchar(45) NOT NULL, `password` varchar(45) NOT NULL, `email` varchar(45) NOT NULL, PRIMARY KEY (`user_id`)); |
That creates a database called usersdb and a table called users. Remember to insert some dummy data into this table.
To interact with MySQL database from Java applications, the MySQL Connector/J library must present in the classpath. Here, we need to copy the mysql-connector-java-VERSION-bin.jar file to the $CATALINA_BASE/lib directory. If you have only one Tomcat instance on your computer, then $CATALINA_BASE is the Tomcat’s installation directory, e.g. c:\Program Files\Apache Software Foundation\Tomcat 7.0 on Windows platform. Doing so help Tomcat loads MySQL JDBC driver when it discovers the JNDI DataSource configuration.
2. Configuring context
To declare a JNDI DataSource for the MySQL database above, create a Resource XML element with the following content:
1
2
3
4
5
6
7
8
9
10
11
12
| <Resource name="jdbc/UsersDB" auth="Container" type="javax.sql.DataSource" maxActive="100" maxIdle="30" maxWait="10000" driverClassName="com.mysql.jdbc.Driver" url="jdbc:mysql://localhost:3306/usersDB" username="root" password="secret" /> |
Add this element inside the root element <Context> in a context.xml file. There are two places where the context.xmlfile can reside (create one if not exist):
- Inside /META-INF directory of a web application: the JNDI DataSource is only available to the application itself, thus it cannot be shared among other ones. In addition, this makes the configuration dependent on the application.
- Inside $CATALINA_BASE/conf directory: this is the preferred place because the JNDI DataSource will be available to all web applications and it’s independent of any applications.
Therefore, we declare above Resource element in the context.xml file under the $CATALINA_BASE/conf directory. The following table describes the attributes specified in the above configuration:
Attribute name
|
Description
|
name
|
Name of the resource.
|
auth
|
Specify authentication mechanism for the application code, can be Application or Container.
|
type
|
The fully qualified Java class name expected by the web application when it performs a lookup for this resource.
|
maxActive
|
Maximum number of database connections in pool. Set to -1 for no limit.
|
maxIdle
|
Maximum number of idle database connections to retain in pool. Set to -1 for no limit.
|
maxWait
|
Maximum time to wait for a database connection to become available in ms, in this example 10 seconds. An Exception is thrown if this timeout is exceeded. Set to -1 to wait indefinitely.
|
driverClassName
|
The fully qualified Java class name of the database driver. For MySQL Connector/J, it is com.mysql.jdbc.Driver.
|
url
|
The JDBC connection URL.
|
username
|
MySQL database user name.
|
password
|
MySQL database user password.
|
For more information about the attributes, visit the reference links mentioned the end of this tutorial.
NOTES:
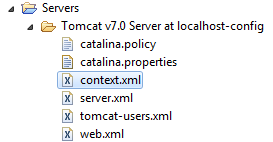
- If you are using Tomcat inside Eclipse IDE, you need to modify the context.xml file under the Servers project. That is because Eclipse made a copy of Tomcat configuration:
- If two resources with the same name both declared in the context.xml files under the web application’s META-INFdirectory and in the $CATALINA_BASE/conf directory, then the internal version takes precedence.
3. Configuring web.xml
Add the following declaration into the web.xml file:
1
2
3
4
5
6
| <resource-ref> <description>DB Connection</description> <res-ref-name>jdbc/UsersDB</res-ref-name> <res-type>javax.sql.DataSource</res-type> <res-auth>Container</res-auth></resource-ref> |
This is necessary in order to make the JNDI DataSource available to the application under the specified namespacejdbc/UsersDB.
4. Coding test JSP page
Now, create a JSP page (UsersList.jsp) to test the configuration we have made:
1
2
3
4
5
6
7
8
9
10
11
12
13
14
15
16
17
18
19
20
21
22
23
24
25
26
27
28
29
30
31
32
33
34
| <%@ taglib uri="http://java.sun.com/jsp/jstl/sql" prefix="sql" %><%@ taglib uri="http://java.sun.com/jsp/jstl/core" prefix="c" %><%@ page language="java" contentType="text/html; charset=UTF-8" pageEncoding="UTF-8"%> <sql:query var="listUsers" dataSource="jdbc/UsersDB"> select username, email from users;</sql:query> <!DOCTYPE html PUBLIC "-//W3C//DTD HTML 4.01 Transitional//EN" "http://www.w3.org/TR/html4/loose.dtd"><html><head><meta http-equiv="Content-Type" content="text/html; charset=UTF-8"><title>Users List</title></head><body> <div align="center"> <table border="1" cellpadding="5"> <caption><h2>List of users</h2></caption> <tr> <th>Name</th> <th>Email</th> </tr> <c:forEach var="user" items="${listUsers.rows}"> <tr> <td><c:out value="${user.username}" /></td> <td><c:out value="${user.email}" /></td> </tr> </c:forEach> </table> </div></body></html> |
Here, we use the JSTL’s SQL tag query to make a SELECT query to the database. Note that the dataSource attribute refers to the JNDI resource name declared in the web.xml file:
1
2
3
| <sql:query var="listUsers" dataSource="jdbc/UsersDB"> select username, email from users;</sql:query> |
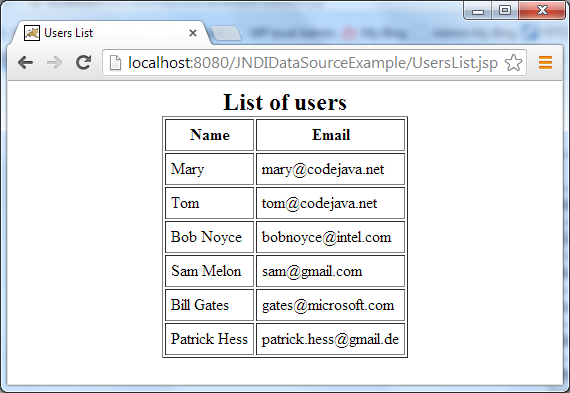
Here’s a sample output when loading the JSP page (http://localhost:8080/JNDIDataSourceExample/UsersList.jsp):
5. Coding test Java servlet
We can look up the configured JNDI DataSource using Java code as follows:
1
2
3
4
| Context initContext = new InitialContext();Context envContext = (Context) initContext.lookup("java:comp/env");DataSource ds = (DataSource) envContext.lookup("jdbc/UsersDB");Connection conn = ds.getConnection(); |
After obtaining the connection, we can use it as trivial JDBC code:
1
2
3
4
| Statement statement = conn.createStatement();String sql = "select username, email from users";ResultSet rs = statement.executeQuery(sql);// iterates over the result set... |
Here’s the source code of an example Java servlet:
1
2
3
4
5
6
7
8
9
10
11
12
13
14
15
16
17
18
19
20
21
22
23
24
25
26
27
28
29
30
31
32
33
34
35
36
37
38
39
40
41
42
43
44
45
46
47
48
49
50
51
52
53
54
55
| package net.codejava.jdbc;import java.io.IOException;import java.io.PrintWriter;import java.sql.Connection;import java.sql.ResultSet;import java.sql.SQLException;import java.sql.Statement;import javax.naming.Context;import javax.naming.InitialContext;import javax.naming.NamingException;import javax.servlet.ServletException;import javax.servlet.annotation.WebServlet;import javax.servlet.http.HttpServlet;import javax.servlet.http.HttpServletRequest;import javax.servlet.http.HttpServletResponse;import javax.sql.DataSource;/** * This servlet class demonstrates how to access a JNDI DataSource that * represents a JDBC connection. * @author www.codejava.net */@WebServlet("/listUsers")public class UsersListServlet extends HttpServlet { private static final long serialVersionUID = 1L; protected void doGet(HttpServletRequest request, HttpServletResponse response) throws ServletException, IOException { PrintWriter writer = response.getWriter(); try { Context initContext = new InitialContext(); Context envContext = (Context) initContext.lookup("java:comp/env"); DataSource ds = (DataSource) envContext.lookup("jdbc/UsersDB"); Connection conn = ds.getConnection(); Statement statement = conn.createStatement(); String sql = "select username, email from users"; ResultSet rs = statement.executeQuery(sql); int count = 1; while (rs.next()) { writer.println(String.format("User #%d: %-15s %s", count++, rs.getString("username"), rs.getString("email"))); } } catch (NamingException ex) { System.err.println(ex); } catch (SQLException ex) { System.err.println(ex); } }} |
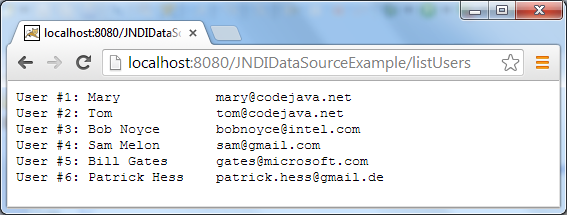
And the following is a sample output when calling the servlet (http://localhost:8080/JNDIDataSourceExample/listUsers):
Alternatively, we can use the @Resource annotation (javax.annotation.Resource) instead of the lookup code above. For example, declare a field called dataSource in the servlet like this:
1
2
| @Resource(name = "jdbc/UsersDB")private DataSource dataSource; |
Tomcat will look up the specified resource name and inject an actual implementation when it discovers this annotation. Therefore, the servlet code looks like this:
1
2
3
4
5
6
7
8
9
10
11
12
13
14
15
16
17
18
19
20
21
22
23
24
25
26
27
28
29
30
| @WebServlet("/listUsers")public class UsersListServlet extends HttpServlet { private static final long serialVersionUID = 1L; @Resource(name = "jdbc/UsersDB") private DataSource dataSource; protected void doGet(HttpServletRequest request, HttpServletResponse response) throws ServletException, IOException { PrintWriter writer = response.getWriter(); try { Connection conn = dataSource.getConnection(); Statement statement = conn.createStatement(); String sql = "select username, email from users"; ResultSet rs = statement.executeQuery(sql); int count = 1; while (rs.next()) { writer.println(String.format("User #%d: %-15s %s", count++, rs.getString("username"), rs.getString("email"))); } } catch (SQLException ex) { System.err.println(ex); } }} |
Орига
Немає коментарів:
Дописати коментар